Saturday 30 June 2018

Making banners in PowerPoint


As well as combining shapes in PowerPoint Text and background images makes for some really interesting results. Follow the tutorial for how to make the impressive SPEED banner
more...


Friday 29 June 2018

Clear screen and switch between apps Mac and windows 10


Fast switching around applications and getting back quickly to the desktop

I am often asked how to get back to the home screen to find a screenshot, picture or other document that a client has placed there. On the Mac and PC it is not too difficult to do. Windows has had available Windows+D for some time and the Mac had the F3 task manager for showing whats going on and allowing you to pick the finder. I hope that this little table gives some pointers


FeaturePCMac
Imagine you are working on your masterpiece of fiction and you need to do some research on a plot line. What do you do?

Easy...
Save your work so far (ctrl+s (pc) cmd+s (Mac))

Open your browser and do your research

Save your research

Return to your novel and carry on

So far so good. Now the practicalilty
Assuming you have Word on the screen you press the windows key to bring up the start screen and tap/click on the browser to open it.
Browse and find your research material and either write it down or save it to OneNote, Keep, or Evernote.
Now switch back to Word using the ALT+Tab keys
Assuming you have Word or Pages on the screen you press the F4 key to bring up launcher and tap/click on the browser to open it.
Browse and find your research material and either write it down or save it to Notes, OneNote, Keep, or Evernote.
Now switch back to Word using the cmd+Tab keys
Fast task switching between open appsALT+TABcmd+TAB
Task managerTask view button on taskbarF3 (or F11 on older models)
Show/hide desktopWIN+D


Windows users seem to have had a tough time adjusting to the start screen beloved of tablet and iPad users to pic apps. However, both Mac and windows PC use the same feature for their app launchers.
Use the Rocket icon (F4 key) (Mac) or Windows icon (Windows Key) (PC)

There are many more shortcut keys and combinations that you can search across the internet. For now just look at the top row of your keyboard and try out some of the features for yourself.


Saturday 23 June 2018

Install Free fonts from the internet on your Mac or Windows 10 PC

To be distinctive in the world companies spend millions on colours, logos and even typefaces (fonts). I use a few favorite fonts myself so I know that I am the author of my own documents and also if somebody else has lifted them. It is easy to change a font in a document to claim it as your own but the formatting will also change and with it the 'feel'.

You can pay for high quality fonts or use the thousands of free opensource fonts on the Internet to convey your message. Posters and newsletters benefit greatly by including the right typeface.

Spot the difference here between two images for our village hoedown (click images to enlarge).


The difference is the use of two western fonts Bleeding cowboys and Westerner. At little cost except time this fundraiser poster could attract a wider audience. Notice also that there is a distinct lack of the rainbow colours so often associated with village posters.

I have made up two quick guides for adding fonts to Mac or Windows. Click the links below

Add font to Windows 10

Add font to MacOS


Speed up startup windows 10 and mac high sierra

There are plenty of tools out there that promise to speed up your mac or PC but why not just make sure that you cover the basics before installing something else on your system. So many people that I encounter have installed an app that promises the earth only to find that it is a scam.

If your pc/mac is struggling then a restart usually works wonders, but make sure that you have closed all applications before you restart.


Windows 10 PC

Assuming that your PC runs windows 10 then the task manager is your first port of call to check what is happening on startup.

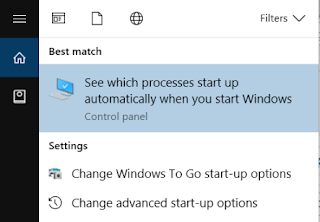
Tap Windows Button and type startup. The search should show something like this in the results. Press Enter to continue or tap/click the entry in the list.


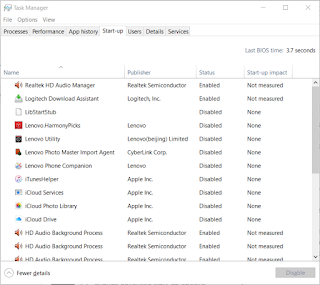
Task manager should open and a list something like this will appear. This shows the apps starting with your PC. To disable them at startup click/tap the app to highlight it and then click/Tap disable.

Knowing which to disable may seem a black art but use task manager along with an Internet search for the full name of the app usually gives you a clue as to which ones you can safely disable.

I looked next to the Processes tab and found that I had several nice McAfee services running in the background that I was unaware of. To remove them I downloaded and used the MCPR.EXE app from Mcafee (click for link)


Mac High Sierra
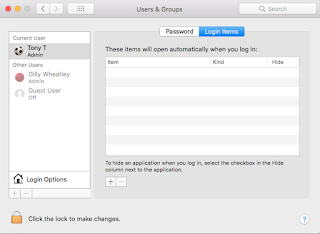
Startup items for the mac are held in the user account preferences.


  • Click the Apple Logo
  • Select System Preferences
  • Select Users and Groups
  • Look for the Login Items option
  • A list of startup items is displayed.
  • To edit this list Click the lock symbol so that it is unlocked
  • Add to the startup list by selecting + under the list, remove by selecting -
  • You can hide any item using the check box but the app is still loaded


Of the apps out there for more advanced options I still love to use Ccleaner from Piriform available as free or paid for versions.

Update: Running Cleaner on my borrowed Mac ( Thanks Gilly) I found that it was infected with the InstallMac trojan (Flashback scam). Hopefully this has now been removed ...phew


Friday 22 June 2018

Create complex shapes in Microsoft office and Mac Pages using Joins and unions

Most Microsoft Office applications allow you to add graphic shapes to documents and there are many to choose from the drop down lists. But what if the one you need is not there! You could layer shapes up to create combined graphics and logos or try to draw out your own using the pen tool. But what if you need a more complex shape or make a graphic similar to the World famous Apple Logo with a chunk taken out. and place it on a tinted or worse still photographic background. To do this you need a cut out, join or union feature using the shapes as raw material. Joining the shapes together just like using Lego but making holes in shapes is a little more demanding.

 I know I will get into trouble from all those people who are screaming out "That's what a drawing/painting/vector graphics App is for", but sometimes I don't want to go searching for another app to learn or have time for complex copying and exporting.

You might think that Publisher and Word would be the first stop on the graphics journey as document processors, but no you would be mistaken. This feature is built into PowerPoint.

The logo on the left was made on a blank PowerPoint slide using text and shapes with some graduated backgrounds. I am sorry if this is your company but it was accidental and that's what happens when you are sitting late writing a blog.


  • In PowerPoint get a blank slide add a couple of shapes from the insert menu overlapping them both. 
  • Highlight both shapes by holding down shift+ clicking each shape.
  • Check you have the Drawing tools Format menu showing (click on it otherwise) and then look for the insert shapes section of the ribbon. You should find the Merge shapes section and a dropdown reveals union, combine, fragment, intersect and subtract options. If you don't know what these do then simply hover the pointer over each option for a preview. The results are glorious without using a complex drawing app.
  • When you have your graphic then copy and paste it from PowerPoint to word, excel etc or use PowerPoints 'Save as Picture' feature.


Powerpoint also has other hidden talents with its options to recolour images, apply artistic effects to images and remove backgrounds from objects or people in photos.

I feel that Mac Pages offers an equally powerful way of manipulating shapes with unite, intersect, subtract,  and exclude options.


  • In Pages open a blank page and add a couple of shapes from the shape menu overlapping them both.
  • Highlight both shapes by holding down shift +clicking each shape.
  • Look to the menu for the Arrange section and at the bottom of the panel will be the options. There is no hover preview so try them all out and use command +Z to undo the changes.


I hope that this gives you a start for creating all sorts of image manipulation.


Monday 18 June 2018

Use a free downloaded font for a POW! graffiti effect

Have a look at this page I made for a short font tutorial. It may need some work! Click the POW!


I am sure you can do better!

I also explored the possibilities of layers and joining graphics and shapes together at the expense of a public figure. Perhaps I shall follow this up with another tutorial. I used star and square shapes along with a silhouette of Don T.


Wednesday 13 June 2018

That old favorite - favorites and bookmarks

Bookmarks and favorites are the same thing but what are they and how do we manage them?


If you find a website that you use regularly or want to find again later then you can add it to your bookmarks. A bookmark saves the address of the site or page for you in a convenient location that you can find. Alternatively you could store the address as a shortcut or in a digital assistant app like Evernote, Microsoft OneNote or Google Keep.

Bookmarks are activated in different ways according to your choice of browser (Safari, Chrome, Opera, Firefox, Edge) but they work in the same way. Most use the term bookmark whilst Microsoft uses the term favorite. Bookmarks are slightly different on tablets/iPad and PC/Mac


Lets bookmark a page in Safari on the iPad.


  • Find the site you wish to remember
  • Tap the share symbol (square with up-arrow) on the toolbar
  • From the menu select Add Bookmark
  • Change the name of the bookmark if it makes no sense to you by retyping
  • Tap Save

View your bookmarks

  • Tap the Book icon from the toolbar to show/hide bookmarks/reading list/shared links
  • Tap the book icon on the side menu to see the list of bookmarks
  • Select and tap the link that you have saved to open the page


Edit or remove bookmarks

  • Tap the Book icon on the toolbar to show/hide bookmarks/reading list/shared links
  • Tap the book icon on the side menu to see the list of bookmarks
  • Tap Edit at the bottom of the side menu
  • Red minus signs appear to the left of the list
  • Tap a minus sign and confirm to delete a bookmark
  • Tap the bookmark to edit its name etc. then save the changes


You can organise your bookmarks into folders in edit mode and then drag and drop your bookmarks into the created folders.

For the Mac the procedure is very similar except there is a sidebar button rather than a book button on the toolbar.


Lets add a bookmark to Chrome

  • Find your page to bookmark
  • Look along the address bar on the toolbar for a star icon
  • Click/tap this icon to open the bookmark dialogue
  • Change the name of the bookmark if you wish and click/tap done


Now look at the bookmarks

  • Look for the three dots options on the toolbar to the right and tap/click
  • Select bookmarks from the options
  • From the list tap/click to display the page that you have bookmarked


Edit or remove a bookmark

  • Open any bookmark that you have saved
  • Tap/click the Star icon
  • Edit or remove the item from the editing panel

Add a favorite to Edge
  • Find your page to favorite
  • Look along the address bar on the toolbar for a star icon
  • Click/tap this icon to open the favorite dialogue
  • Change the name of the favorite if you wish and click/tap done
Now look at the favorites

  • Look for the star with trailing lines icon on the toolbar to the right and tap/click
  • Select favorites from the options
  • From the list tap/click to display the page that you have Favorited


Edit or remove a favorite


  • Open any bookmark that you have saved
  • Tap/click the Star icon
  • Edit or remove the item from the editing panel

Other browsers are pretty similar. And just like Safari you can organise you bookmarks/favorites into folders to make the list more organised

Using Keep/OneNote/Evernote to store favorites


Clipping an Internet address to one of these organisers may seem like a step too far but has great advantages if you have multiple devices and if they are not on the same system.

Copy an address (URL) and paste it into Google keep on your iPad means that it will be available on your PC/phone or mac if you install the app on them. With Evernote the whole webpage is clipped, not just the address. 

Sharing a site with Google Keep iPad/mac*

  • Find the page to keep
  • Tap the share icon on the toolbar, look for the light-bulb icon for Keep and tap to select
  • A sub window will open and you can add some notes to go with your keepsake.
  • Tap Post to add it to your keep account
*assumes that you have installed Keep on your iPad/mac

Sharing a site with OneNote on Windows Edge browser


  • Find the page to keep
  • Tap the share icon on the toolbar, an arrow out of a box and tap/click to select
  • A sub window will open, tap/click on the OneNote icon.
  • OneNote opens and you have the option to add a note to go with your keepsake
  • Click/tap send to save to OneNote


Add shortcut to home screen or desktop

On Mac/pc/ipad you could save the URL as a desktop icon

Mac/IOS
  • Find the page to keep
  • Click/tap sharing icon on toolbar
  • Look for Add to home screen

Windows
  • Find the page to keep
  • Copy URL to clipboard (Ctrl+c when highlighted)
  • Windows+D hides everything but the desktop
  • Right click the desktop to open the options menu
  • Select New > Shortcut
  • From the shortcut wizard click in the address bx and paste the web address (ctrl+v)
  • Click next
  • Type a name for the link
  • Tap/click finish
Chrome on android
  • Find the page to keep
  • Tap the three dots menu button
  • From the menu tap Add to Homescreen
Edge on windows phone/PC
  • Find the page to keep
  • Tap the three dots menu button
  • From the menu tap pin page to the taskbar or pin page to the start


windows 10 updates keep on coming weekly but no new features this time around

I updated my PCs running windows 10 today with the June 12 update. There have been no great changes to windows 10 since the version 1803 upgrade. The updates are really bug fixes for older versions. The latest that I have (not on the developer ring) is build 17134.48.

If you want to find out which version of windows you have installed then simply press the windows key, type in the search box winver and press Enter. A box similar to the one shown here should appear. If your machine shows an earlier version don't worry but if you wish to upgrade manually then press the windows key, type in the search box updates and update the machine.

My clients and students have noticed that during upgrading the system seems to slow down. The answer unfortunately is patience and restarting. Leave the machine working for a period on its own but remember to check out whether it needs a restart ever so often. When you update or upgrade I always recommend restarting the s
ystem.

Sunday 10 June 2018

fun with colourising old photos

Everyone has a back catalogue of old photos in their possession. some cringing, others that may make you smile or cry. I looked at the one here with great nostalgia of my sister and I at school photos time. It took me back to simpler days. Of course I looked at that old photo in black and white and wondered if Affinity Photo could do the colourising that I have done in the past with Photoshop.

The answer is yes of course.

I used the techniques of guessing colours and keeping colours on separate layers for this one so it may not be the truest version of the day but none the less it was good enough for her to say OK that was us then. I may publish a colour tutorial hopefully taking more than the hour that I spent on this one with better results.

What do you think?


Tuesday 5 June 2018

Affinity Photo vs Photoshop and brushes

I have used Photoshop for commercial work since it began on the Mac and became available for my PC. Undoubtedly it is a formidable piece of software that I have used for catalogues, posters and web development graphics. Teamed up with InDesign Adobe have met most of my creative/design needs.

Adobe is nowadays following a rental route for its software which I and many others find a challenge. Its not the money. If you can't get your moneys worth from Adobe software then you don't actually need it. Smart objects and content aware actions are just two features that save so much time when producing graphics or touching up photos. I was prepared to pay the annual upgrade fees to pay for the work and support of the team ,but having made the initial outlay way back to purchase, I can't help it I want something to keep.

There are other paid for and free offerings such as Paintshop Pro, Paint.net, Dx0 photo and Gimp and many of them try to emulate Photoshop to tempt me away and have failed. The Gimp is even available with a Photoshop skin as Gimpshop. Serif has always offered a budget photo editor that I didn't take them too seriously until they produced Affinity Designer and Photo. I found that Serif's UK born Affinity Photo is a great challenger to Photoshop with some great unique features. Affinity Photo is also available as a full application for iPad. Having used it for some time I found that the PC version was a little slow to load images than Photoshop but this seems to have been improved over time and I have pushed myself to do all my editing with Affinity. The blog background was created from scratch using Affinity Photo. Considering that It is so reasonable in price, UK made and supported and will soon have Affinity publisher to rival InDesign I find myself thinking this is a reboot of the 90's when I moved over to Photoshop and InDesign from Letraset Studio and QuarkXpress

One of the anchors keeping us with Photoshop was Plugin support. The alternatives didn't support plugins like Nik and other custom addins that have evolved over the years to add to Photoshop. Look here for an article by Andy Betts on the top ten plugins for Photoshop. I like the inclusion of https://www.pexels.com/ for royalty free images. Affinity supports plugins but not Photoshop actions so not all the extensions such as ZXP actions.

 Likewise many custom brushes are so useful and there is a thriving business in fonts and brushes for Photoshop.Its easy to import 'Photoshop brush' files into Affinity Photo. Follow this link or click the logo below to learn how.


New gmail interface

I have loaded the new Gmail interface for my mail and love how fast it seems to work. I like the instant inline tools that appear as I roll the pointer over the email list and the convenient calendar, and tasks tools menu to the right. I don't know all the other changes that have been made under the hood but my immediate reaction was where are my contacts. They used to be under the GMAIL dropdown but no more. 

All is not lost though since they can be accessed using the nine dots google apps dropdown. If they are not on your list click More to pick the contacts icon. You can drag this up to the top of the apps list using click and drag.

Another feature is Snoozing where you can mark an email as remind you at a particular time or place etc. More about this I am sure to come. 

Gmail can now nag you if it feels that you have ignored an important email or content needs responding to. I am not sure this feature is for me but others have commented that when they have no time to respond to everything the idea or priority mail is attractive

Googles proposed confidential mail has not arrived just yet but I am sure that it will be along soon giving more control over mail with features such as time limited availability and two step verification.

The desktop layout is a cosmetic change that I find makes little impact on my working practice and the idea of focussed attachments for opening in preview mode could be a bonus.

Adding colour palettes from adobe color cc to your documents

We love using Adobe color cc to create custom palettes to use from photos and other existing documents. Importing them into high end publishing and design tools is pretty straight forward with the ASE file that you can save and download. (See our colour wheel tutorial here). What happens when you wish to apply the theme to applications like Word or PowerPoint. There are two ways that you can transfer the colours into a palette in your application without the ASE file.

First generate your palette using the color wheel or imported picture. I have chosen an imported picture that I use on my Blog.

From the top left corner select import image


A file browser appears and you can choose an image. If you prefer make up a palette from the color wheel instead.


Now select COLOR WHEEL and scroll down to the bottom of the page so that you can see the color swatch and the writing underneath. The writing is the RGB (red green blue) values of the color palette.


These values can be written down and used in your documents or shared with colleagues so they use the same colours for club or company documents.

Click here for examples of how to apply the colours in Word, PowerPoint or Libre Office.


Monday 4 June 2018

Opening PDF files for editing

PDF (Portable Document Format) is a proprietary format designed by Adobe. Viewers are available for almost every device so anyone can open a PDF for viewing or printing.

PDF has been extremely successful in the desktop publishing and print business as designers and authors can create documents that can be sent globally. More recently PDF has become a popular ebook format too. A shared PDF can be printed or viewed with custom fonts, drawings and layouts faithfully reproduced. The original program does not have to be on the device the document is sent to.

Many office and drawing programs can make PDF files including Microsoft Office and Adobe Photoshop. Others use PDF printer drivers to do the same thing.

PDF documents are meant to be 'read-only' but many people wish to edit PDFs sent to them. Adobe Acrobat designed by Adobe is able to do this but Adobe Illustrator, Scribus and Libre Office can open PDF multi-page documents, edit and export PDF files.

more...

Sunday 3 June 2018

A visitor to our garden

Dawn and I were chilling in the garden - just finished our lunch in the conservatory - when with a thud a large flying thing with wings darted in, made enough noise for Dawn to beat a retreat, bashed its head a little around the skylights of the conservatory and settled on a blind for a rest. I saw it was a dragonfly and was obviously confused as our conservatory is not a pond and our pond is only just over a metre square, not your typical resting place for a big monster.

We caught it in a jamjar so that we could photograph it and release it. A camera fetched, and as we took pictures it seemed quite happy to sit on the (much calmer) hand of Dawn. Neither of us are great dragonfly fanciers and so had no idea what it was. So onto Google.


I used the google images tool to upload a picture and identify our dragonfly


To use it go to the google homepage and look for images on the right hand side or just go directly to google images https://images.google.com/ The camera icon allows you to upload a picture from your device or camera and away you go. We have found this pretty succesful so far although not foolproof. It prefers images that have few other objects to confuse so plain backgrounds are a bonus. A couple of the pictures we took were confounded by Dawns finger.

Our search took us the the broad bodied chaser. It turns out that the one we had visit was a female.